Windows virtualenv installation
Warning
This installation procedure is much more involved then the one using WinPython as described in Installation. Without good reason please use WinPython version.
Python
Install Python 2.7 using appropriate installer: Python 2.7.3 x86 MSI Installer
Warning
After installation append paths to python.exe (i.e. C:\Python27) and path to directory
Scripts (i.e. C:\Python27\Scripts) in the PATH
environment variable.
Virtualenv
Instead of installing packages systemwide in these instructions we use virtualenv to create an isolated Python environment and then install packages into this environment. This procedure is more demanding but has the advantage of being independent from the rest of the system.
To install virtualenv first install distribute and pip:
download distribute_setup.py
download get-pip.py
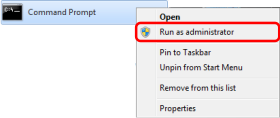
enter elevated/administrator command prompt: right click on the Command prompt icon and select Run as administrator
Navigate to the directory where the files were downloaded (i.e.
C:\Users\user\Desktop) and run following commands:C:\> cd Users\user\Desktop C:\Users\user\Desktop> python distribute_setup.py C:\Users\user\Desktop> python get-pip.py
After this distribute should be installed so downloaded files and temporary
builddirectory can be deleted.Install
virtualenv:C:\Users\user\Desktop> pip install virtualenv
Note
When the installation of virtualenv is completed the elevated/administrator Command prompt
is not needed anymore so it can be closed. All subsequent commands should go in the regular
Command prompt.
Pymote virtual environment
To make a virtual environment in which all other packages are going to be installed first navigate to the directory in which you want to set up environment. This can be any directory and in the following steps we use
C:\Users\user\Documents:C:\Users\user> cd C:\Users\user\Documents C:\Users\user\Documents> virtualenv pymote_env New python executable in pymote_env\Scripts\python.exe Installing setuptools................done. Installing pip...................done.
This command has made a new directory
pymote_envinsideC:\Users\user\Documentswith separate python interpreter and two necessary packages.
Activate environment:
C:\Users\user\Documents> pymote_env\Scripts\activate
(pymote_env) C:\Users\user\Documents>
Note
The
(pymote_env)prefix to prompt in the last line indicates that newly created environment is activated. All subsequently installed packages from this modified command prompt end up in the activated environment. Environment can be deactivated with commanddeactivate.Set
PYMOTE_ENVenvironment variable as path topymote_envdirectory. This way all executables that are not being started from the modified command prompt should know where to look for the environment and its packages.Note
In Windows Vista and later use command
setx PYMOTE_ENV "C:\path\to\pymote_env"to save environment variable permanently. In XP use the normal way through Control Panel (instructions).Launch text editor (use Notepad++ or WordPad, do not use plain Notepad) and open
pymote_env\Scripts\activate.batfile. To display the.batfiles in open dialog you have to chose All Documents (*.*) from the file types dropdown.Add line
set IPYTHONDIR=%VIRTUAL_ENV%\.ipythonbelow the line that setsVIRTUAL_ENVenvironment variable, near the top. Save the document. This way IPython package which is not yet fully compatible with the virtualenv knows where to look for its conguration files.Open
pymote_env\Scripts\deactivate.batin text editor and insert lineset IPYTHONDIR=just below the line@echo off, near the top of the document. Save the document.
Warning
After setting the environment variable and modifying activate.bat and deactivate.bat
scripts you must restart the Command prompt and reenter/reactivate pymote_env. If all goes
well commands echo %PYMOTE_ENV% and echo %IPYTHONDIR% should print environment paths.
Required packages
All required packages are installed in the environment created in the previous section so before
continuing ensure that the environment is activated. Active environment is indicated with prompt
prefix i.e. (pymote_env).
NumPy and SciPy
Since normal installation of these packages requires compiling we make a shortcut by using precompiled binaries and installing them into virtual environment using this solution:
Download NumPy binary numpy-1.7.0-win32-superpack-python2.7.exe and SciPy binary scipy-0.11.0-win32-superpack-python2.7.exe.
Do not run downloaded
.exefiles as that would install them systemwide. Instead extract them (with 7-zip) in some temporary directory i.e.C:\Users\user\Desktop.Based on your processor support of SSE instructions (probably sse3, see the note below) install appropriate extracted
.exefiles (nosse|sse2|sse3) usingeasy_installcommand:(pymote_env) C:\Users\user\Desktop> easy_install numpy-1.7.0-[nosse|sse2|sse3].exe (pymote_env) C:\Users\user\Desktop> easy_install scipy-0.11.0-[nosse|sse2|sse3].exe
Note
SSE3 instructions are supported by all reasonably modern processors. If you’re not sure try CPU-Z.
After installation all downloaded and extracted files can be deleted.
Matplotlib
Matplotlib package
is installed almost the same way as NumPy and SciPy packages in previous section using the
appropriate binary matplotlib-1.2.0.win32-py2.7.exe.
The only difference is in the 3rd step where the extracted contents from directory
PLATLIB should be copied to pymote_env/Lib/site-packages/ directory:
C:\Users\user\Desktop> xcopy /s matplotlib-1.2.0.win32-py2.7\PLATLIB\* %PYMOTE_ENV%\Lib\site-packages
Pyreadline
For Pyreadline package use easy_install as pip currently installs version
1.7.1.dev-r0 which does not work well with IPython:
(pymote_env)> easy_install pyreadline
PySide
For Pymote GUI part of the library PySide Qt bindings for Python should be installed. This is achieved using this solution, that is, running following commands:
(pymote_env)> easy_install PySide
(pymote_env)> python pymote_env\Scripts\pyside_postinstall.py -install
Pymote
Finally, in order to download and install Pymote and all other required packages there are two aviliable options, use one of them:
Stable: for latest stable version use package from PyPI:
(pymote_env)> pip install pymote
Development: to install latest development version of the Pymote use source from github repo:
(pymote_env)> pip install -e git+https://github.com/darbula/pymote.git#egg=Pymote
To list all packages installed in the environment run pip freeze. The output should look
something like this:
(pymote_env)> pip freeze
Pymote==0.1.1
ipython==0.13.1
matplotlib==1.2.0
networkx==1.7
numpy==1.6.2
pypng==0.0.14
pyreadline==1.7.1
pyside==1.1.2
scipy==0.11.0
Starting Pymote
Before starting, make sure that virtual environment is activated windows and run ipymote for interactive console or pymote-simgui for simualtion GUI. For more details refer to Starting Pymote.
Additional customization
The recommended way to avoid starting command prompt, activating the virtual environment and running ipymote in it is to make a shortcut to the ipymote.exe file on the desktop, taskbar or start menu.
You can customize prompt can be additionaly customized by right clicking on the shortcut and selecting Properties from the menu. Highly recommended customizations are:
- in Options tab enable QuickEdit mode
- in Font tab change font to Consolas and size to 16
- in Layout tab increase Screen buffer size Height from 300 to at least 3000
The loading of the correct environment when shortcut is double clicked is possible via previously set PYMOTE_ENV environment variable which points to the environment location.